Friday, 5 June 2015

Orthographic projections Conventions and projections of simple solids

Orthographic Projections
Lines are used to construct a drawing. Various type of lines are used to construct meaningful drawings. Each line in a drawing is used to convey some specific information.  The types of lines generally used in engineerign drawing is shown in Table
Types of lines generally used in drawings

All visible edges are to be represented by visible lines. This includes the boundary of the object and  intersection between two planes. All hidden edges and features should be represented by dashed lines.  Figure  shows the orthographic front view  (line of sight in the direction of arrow)of an object. The external boundary of the object is a rectangle and is shown by visible lines.  In Figure, the step part of the object is hidden and hence shown as dashed lines while for the position of the object shown in figure, the step part is directly visible and hence shown by the two solid lines.


shows the pictorial view and front view of the object when the middle stepped region is (a) hidden and (b) visible.
Figure shows the front view  (view along the direction indicated by the arrow) of a solid and hollow cylindrical object.  The front view of the solid cylinder is seen as a rectangle figure. For the hollow cylinder in addition to the rectangle representing the boundary of the object, two dashed lines are shown to present the boundary of the hole, which is a hidden feature in the object.

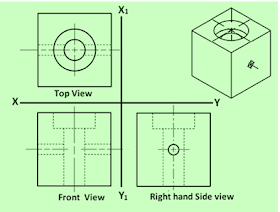
Next Figure shows the Front view of  three objects. Figure is the view of one part of a hollow cylinder which has been split in to two equal parts. The wall thickness can be represented by the two visible lines. Figure  is  one part of  solid cylinder which has been sectioned in to two equal part.  Where as figure   is one part of a solid cylindrical part which has been split in to two unequal parts. The edge formed by the intersection of two surfaces are represented by solid lines. In case of cylindrical objects or when holes are present in a component, the center of the holes or center lines of cylinder will have to be represented in the drawing by means of center lines as shown in figure .  Figure 5 shows the FV, TV, and RHSV of an object showing visible edges, hidden edges (or holes), and center lines.
shows the pictorial view and front view of (a)  a hollow cylindrical object and (b) solid cylindrical object.
shows the pictorial view and front view of sectioned part of (a)  a hollow cylindrical object  (b) solid cylindrical object and (c) solid cylinder split in to two unequal parts.

shows the centre lines for cylindrical objects
Showing TV, FV and RHSV of an object showing the three types of lines mentioned above. The pictorial view of the object is shown at the top hight hand side.

Conventions used for lines
In orthographic projections, many times different types of lines may fall at the same regions. In such cases, the following rules for precedence of lines are to be followed:
·        Visible lines take precedence over all other lines
·        Hidden lines take precedence over center lines
·        Center lines have lowest precedence
When  a visible line and a hidden line are to be drawn at the same area, It will be shown by the visible line only and no hidden line will be shown.  Similarly, in case of hidden line and centre line, onlu hidden line will be shown. In such case, the centre line will be shown  only if it is extending beyond the length of the hidden line.
Intersecting Lines in Orthographic Projections
The conventions used when different lines intersect is shown in figure

The conventions practiced for intersection lines.

The conventions practiced for intersection lines.
Some ortho graphic projections of solids  showing the different lines and their precedence are shown as examples below. The 3-D view of the respective objects are also shown in the figures with the direction of arrow representing the line of sight in the front view.
A few examples of the projections showing the conventions in drawing are presented below.

Example 1
Example 2

Example 3
Example 4


No comments:

Post a Comment