Design
and Manufacturing
A machine element, after design, requires to be manufactured to give it a shape
of a product. Therefore, in addition to standard design practices like, selection of proper material, ensuring proper
strength and dimension to guard against failure, a designer should have knowledge
of basic manufacturing aspects.
In this lesson, we will discuss
briefly about some of the basic manufacturing
requirements and processes.
First and foremost is assigning proper
size to a machine element from manufacturing view point. As for example, a shaft may be designed
to diameter of, say, 40 mm.
This means, the nominal diameter of the shaft is 40 mm, but the actual size will be slightly different, because it is impossible to manufacture a shaft
of exactly 40 mm diameter,
no matter what machine
is used. In case the
machine element is a mating part with another one, then dimensions of both the parts become important,
because they dictate the nature of assembly.
The allowable variation in
size for the mating parts is called
limits and the nature of assembly due to such variation in size is known as fits.
Limits
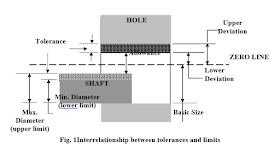
Fig. 1 explains
the terminologies used in defining tolerance and limit. The
zero line, shown in the figure, is
the basic size or the nominal size.
The definition of the terminologies is
given below. For the convenience, shaft and hole are chosen to be two mating components.
Tolerance
Tolerance is the difference between maximum and minimum dimensions of a component, ie, between upper limit and lower limit.
Depending on the type of application, the
permissible variation of dimension is set as per available
standard grades.
Allowance
It is the
difference of dimension between two mating parts.
Upper deviation
It is the difference of dimension between the maximum possible size of the component and its nominal size.
Lower deviation
Similarly, it
is the difference of dimension
between the minimum possible size of
the component and its nominal
size.
Fundamental deviation
It defines the location of the tolerance zone with respect to the
nominal size. For that matter, either of
the deviations may be considered.
Fit System
We have learnt above that a machine part
when manufactured has a specified tolerance. Therefore, when two mating parts fit with each other, the nature of fit is dependent on the limits of tolerances and fundamental deviations of the mating parts. The nature of assembly
of two mating parts is defined by
three types of fit system, Clearance Fit, Transition Fit and Interference
Fit. The fit system is shown schematically in Fig.3.
There are two ways of representing
a system. One is the hole basis and the
other is the shaft basis. In the hole basis system the dimension of the hole is
considered to be the datum, whereas, in the shaft basis system dimension
of the shaft is considered to
be the datum. The holes are normally made by
drilling, followed by reaming.
Therefore, the dimension of a hole is fixed due to the nature of the tool used.
On the contrary, the dimension of a shaft
is easily controllable by standard manufacturing processes. For this reason,
the hole basis system is much more popular than the shaft
basis
system. Here,
we shall discuss
fit system on hole basis.
Clearance Fit
In this type of fit, the shaft of largest possible
diameter can also be fitted easily even in the hole of smallest
possible diameter.
Transition Fit
In this case, there will be a clearance between
the minimum dimension of the shaft and the minimum dimension of the hole. If we look at the figure carefully,
then it
is observed that
if the shaft dimension
is maximum and
the hole dimension is minimum then an overlap
will result and this creates
a certain amount of tightness in the
fitting of the shaft inside the hole. Hence,
transition fit may have either clearance or overlap in the fit.
Interference Fit
In this case, no matter whatever may be the tolerance level in shaft and the hole, there is always a overlapping
of the matting parts. This is known
as interference fit. Interference
fit is a form of a tight fit.
Standard limit
and fit system
Fig. 4 shows the schematic
view of a standard limit and fit system. In this figure tolerance is denoted as IT
and it has 18 grades; greater the
number, more is the tolerance limit. The fundamental deviations for the
hole are denoted by capital letters from A and ZC, having altogether 25
divisions. Similarly, the
fundamental deviations for the shaft
is denoted by small letters from a to zc.

Here H or h is a typical case, where the fundamental deviation
is zero having an unilateral tolerance
of a specified IT grade.
Therefore in standard
limits and fit system we
find that, Standard tolerances
18 grades: IT01, IT0 and IT1-1T16
Fundamental deviations
25 types: A- ZC (For holes)
a- Zc (For shafts)
The values of standard tolerances and fundamental
deviations can be obtained
by consulting design hand book. It is to be noted
that the choice of tolerance grade is related to the type of
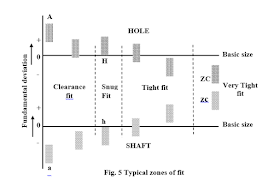
manufacturing process; for example, attainable tolerance grade for lapping process is lower compared to plain milling. Similarly, choice of fundamental deviation largely depends on the nature of fit, running fit or tight fit etc. The approximate zones for fit are shown in
Fig.5. Manufacturing processes involving lower tolerance grade are generally costly. Hence the designer has to keep in view the manufacturing processes to make the design effective and inexpensive.
Sample designation of limit and fit,
50H6/g5.
The designation means that the nominal size of the hole and the shaft is 50 mm. H is the nature of fit for the hole
basis system and its fundamental deviation
is zero. The tolerance grade for
making the hole is IT6. Similarly, the shaft has the fit type
g, for which the fundamental deviation
is negative, that is, its dimension
is lower than the nominal size, and tolerance grade is IT5.
Common manufacturing processes
The
types of common manufacturing processes are given below in the Fig.6
The types of shaping
processes are given below in
the Fig. 7.
Following
are the type of machining processes, shown in Fig. 8.
Various joining
processes are shown in Fig.
9.
The surface
finishing processes are given below (Fig.10).
The
non-conventional machining processes
are as follows (Fig.11),


No comments:
Post a Comment